Setup Guide
What you will need
- n x Raspberry Pi 4s (n will depend on your use case, we had 15).
- One micro SD card for initial setup of the Pis.
- Minimum 8GB.
- A server computer (this can be a laptop, another Pi, a desktop computer or an actual server).
- For any of these options, a decent storage capacity will be required (Minimum 64GB) to boot from and serve content to the client Pis.
- Depending on your use-case you may need a lot more storage (our server has a 480GB SSD which holds all the offline educational content).
- n+2 ethernet cables to connect all the Pi’s to the local network.
- A switch (with at least n+2 ports).
- This can be a gigabit switch (recommended) or a router configured to act as a switch.
- 4G/LTE router for internet and to act as the DHCP server for the Pis.
- n x accessories for each of the Pis.
- Monitors, keyboards, mouses, microHDMI-to-HDMI cables, power supplies for the Pis, headphones etc.
Setting up the Client Pis
- The first thing we need to do is set the Pis up for network booting. By default the Pis atempt to boot up from the SD card, but we can configure the Pis to atempt booting up from the network.
-
You will need to first boot the Pis from an SD card to configure it for network booting. In order to do this, we recommend you use Raspberry Pi Imager to write your chosen OS (Raspberry Pi OS is probably simplest) to the SD card
- Then repeat the following for each of the Raspberry Pi 4s that are going to be used as client devices:
- Insert the SD card into the Pi and connect the power supply.
- Connect the Pi to a display with a microHDMI-to-HDMI cable. You should see the Pi booting.
-
Once booted, open a terminal (CTRL+ALT+T from the RPi-OS desktop) and type the following line to open the Raspberry Pi Configuration Tool:
sudo raspi-config - Use the keyboard to enter the
Boot Optionsmenu and enable network booting from here. - Reboot the Raspberry Pi with
sudo reboot. - Your Pi 4 should atempt to network boot from now onwards whenever an SD card is not in the Pi. We can now move on to setting up the ethernet network to connect the Pis to the server.
If you power up your Pi 4 now without an SD card in it, it should get stuck on a black debug screen with the Raspberry Pi logo in the top right hand corner. This screen usually displays some useful information which you can use to diagnose what is going wrong incase your Pi won’t boot. But for now, we expect our Pi to get stuck here because we have not connected it to a server that can give it an OS.
Setting up the local network
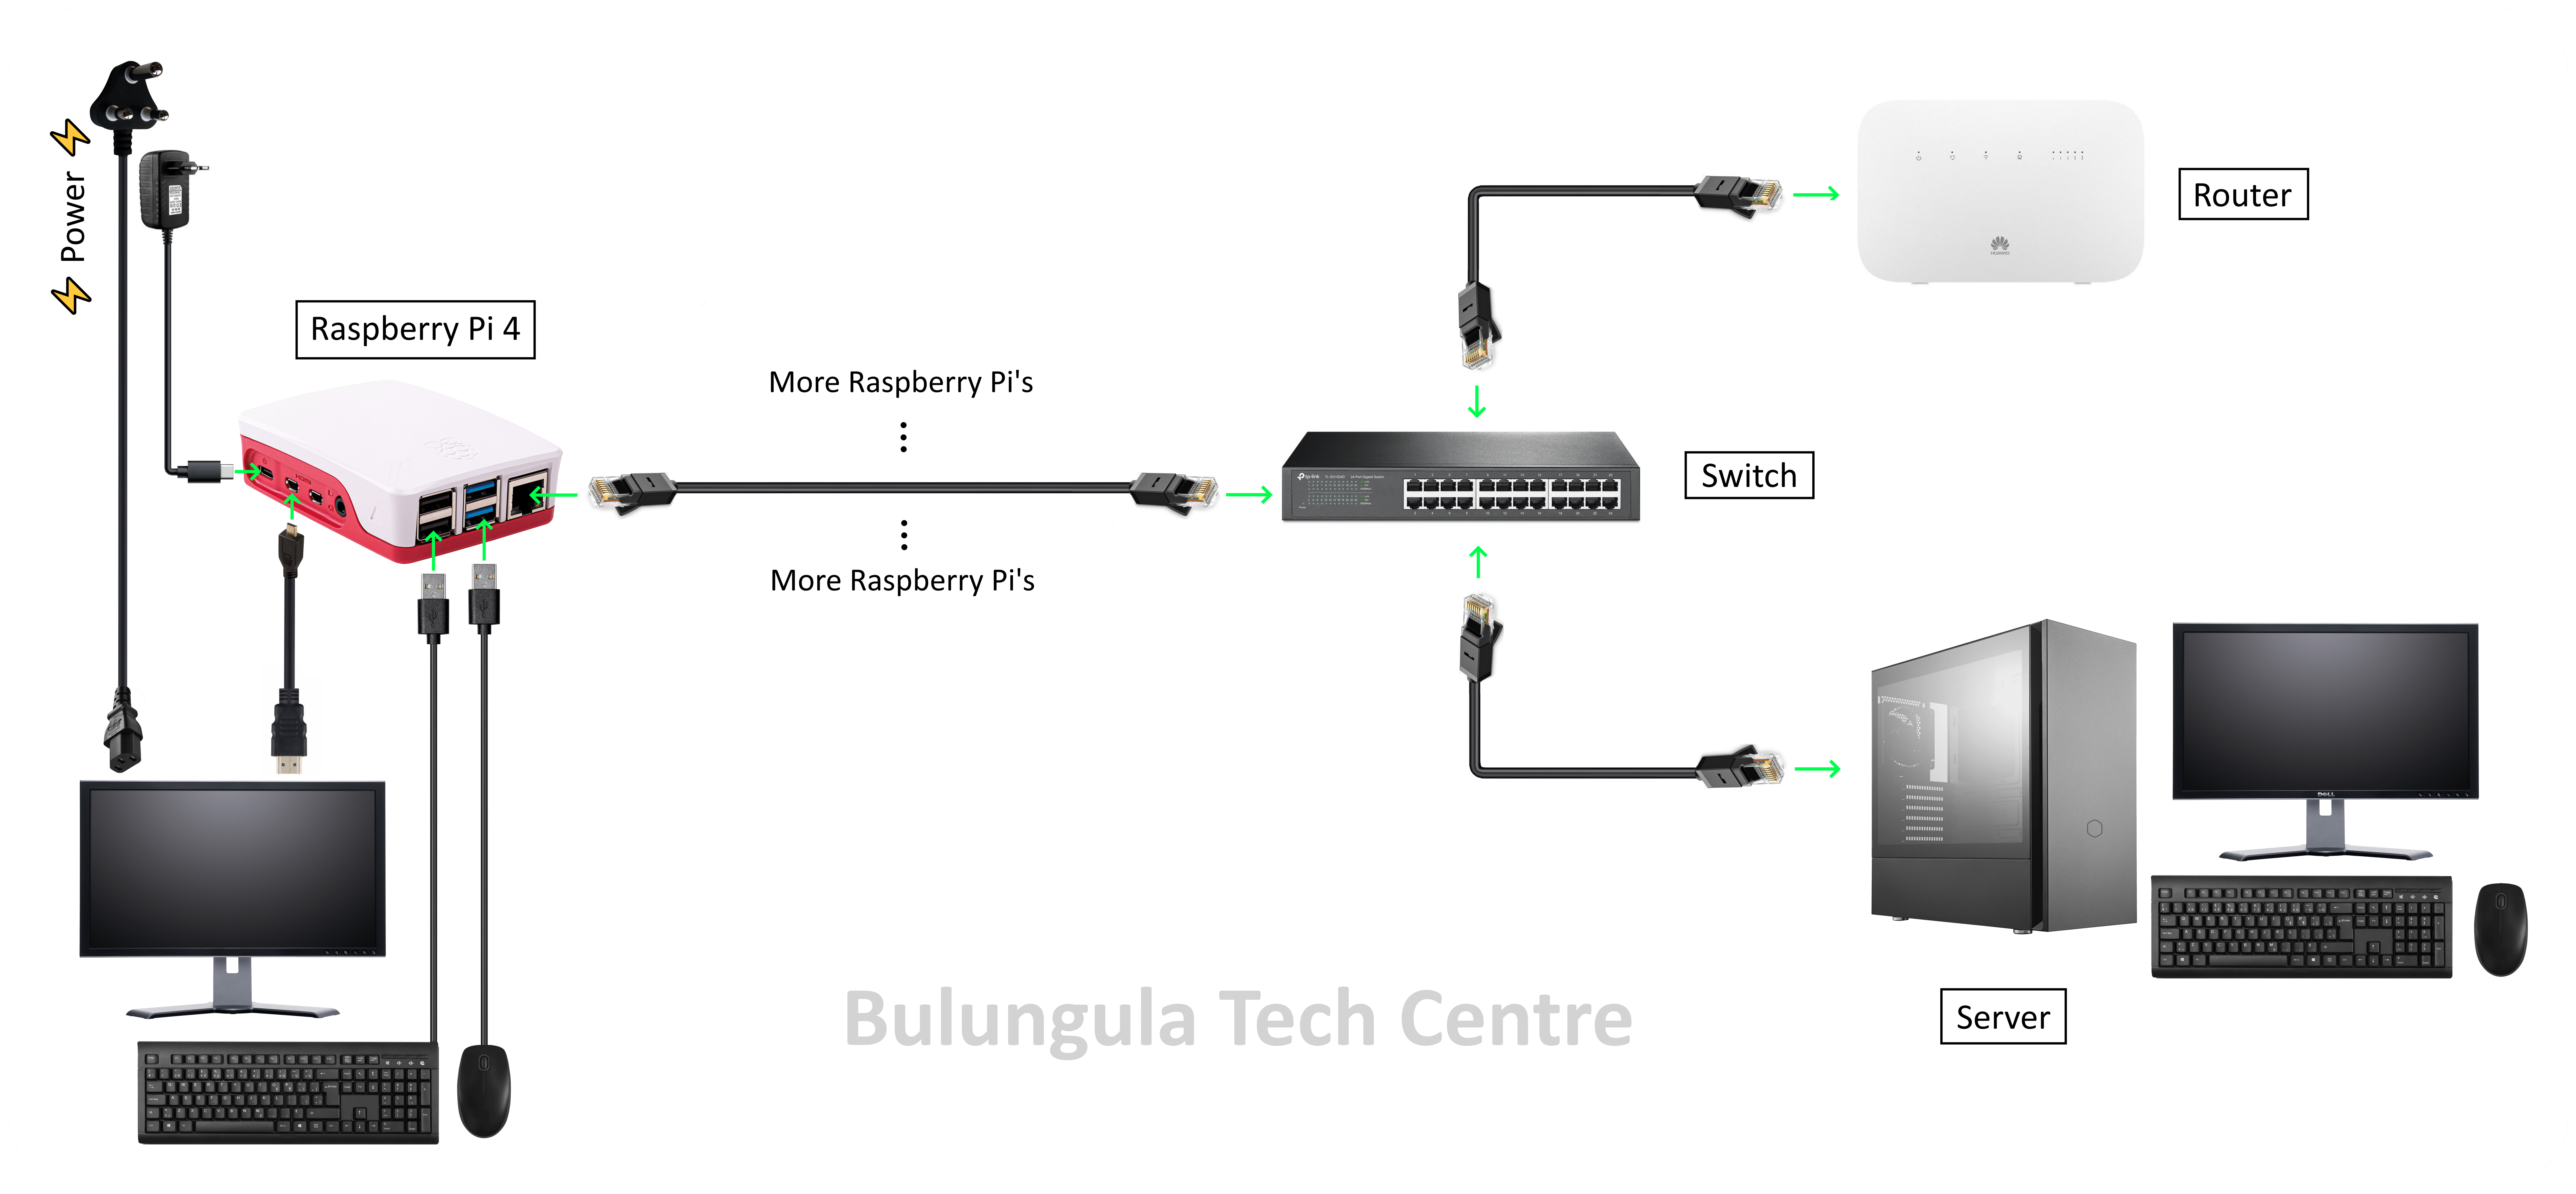
The Pis, Server and Router have to be connected together via ethernet to form a local network. Use the ethernet cables to connect each of the Pis to the router. If your router does not have enough ethernet ports to accomodate all the Pis, then you will need to buy a network switch to expand the number of ports. If you use a switch, remember that you still need to connect the router to the switch because the router acts as the DHCP server (i.e. it assigns IP addresses to the devices on the network) and without a DHCP server the setup will not work. Finally, the server should also be connected to the network via ethernet.
We provide a wiring diagram below.

Remeber to remove the SD card from all the Pis. At this point, if you try turning on the Pis, they will still get stuck on the boot screen, because they are atempting to network boot but we have not configured the server to provide the OS yet. Lets do that next.
One other important thing to do at this stage is to configure things so that the server has a fixed (static) IP address. This is important later on because the Pis need to know exactly which IP address to go to to get the OS when they boot up. If the IP address of the server changes then the Pis will fail to boot. There are two possible ways to achieve this:
- You can either google the model of your router and find instructions on how to set a static IP address for a device from the router. It is generally not too tricky, you will need to login to your routers user interface and change a couple settings.
- Alternativly, you can set a static IP from the server itself. Here are instructions on how to set a static IP on Ubuntu.
Setting up the Server
As mentioned before, you can use a laptop, desktop or even another Pi as the server. But the server will need a fair amount of storage since it will store the filesystem for all of the networked Pis. So we recomend using a ully fledged PC (laptop/desktop) running Ubuntu 20.04. The server needs to be running linux because we will be using an open-source bit of software called Pi Server.
Pi Server makes it as easy as plug-and-play to network boot Raspberry Pis. Head over to the Pi Server GitHub repo and follow their instructions on how to build and install Pi Server.
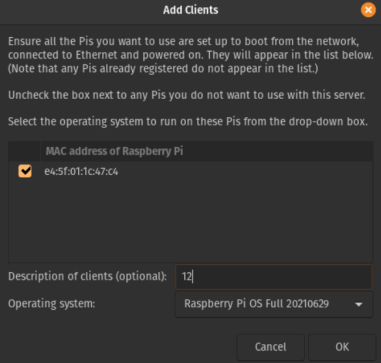
Once you have Pi Server installed you can start it by typing sudo piserver into a terminal window. You should see the Pi Server GUI window pop up with a setup wizard. Follow the prompts on screen until you get to the section on adding clients. At this stage you should hopefully start seeing your client Pis apearing on the list (the MAC addresses of the Pis appear in the list).

If nothing is apearing in the list then you should:
- Ensure that the server, Pis, switch and router are all connected properly. A good troublshooting trick is to reboot everything (when in doubt reboot everything). I would suggest powering off the Pis, switch and router. Then turn everything back on but in the following order: First turn the router on and give it some time to reboot properly. Then turn the switch on. Finally, turn all of the Pis back on. Hopefully after 10-15 seconds the Pis will start apearing on the list now.
- If the Pis are still not showing up, you may need to go back and check that you properly configured them for networking booting and that you didnt accidently leave a SD card in the Pi.
Once all your Pis apear on the list you can go through the rest of the Pi Server setup wizard. At some stage in the setup you will need to chose an operating system (OS) to use for the Pis. We recomend selecting Raspberry Pi OS Full since it includes a fully fledged desktop environment and usefull applications. It will take some time to download the OS from the internet, so be patient.
Once you get to the end of the setup, the Pi 4s should automatically receive the OS from the server and proceeed to booting up. Hopefully after a minute or two the Pis will boot into a login screen. At this point you should be able to use the login details you created during setup to login to your network booted Pi.
Congratulations you have successfully setup Pi Server.
Optional Extras
Kolibri: Offline Learning Platform
If you are going to use your Pis as a learning center in a school you might like to consider installing Kolibri on the server. Kolibri as an open-source project which provides a digital learning experience for offline computer labs. Head over to the download page and follow the instruction on how to set it up on Ubuntu.
Once you have Kolibri setup on the server, you should be able to reach Kolibri from any of the Pis by typing xxx.xxxx.xxx.xxx:8080 into the search bar of the browser, where xxx.xxx.xxx.xxx is the IP address of the server (which you set earlier in the setup).
OpenVPN: Remote Access
You might like to be able to remotely connect to the server from another PC to offer remote support, if neccessary. We found that the easiest way to accomplish this was to setup the server as a host on a virtual private network (VPN). Then if you connect a PC to the same VPN, it is really easy to connect to the server via SSH or a remote desktop protocol such as VNC.
We use the open-source VPN, OpenVPN. OpenVPN also offers a service which allows you to host a VPN on their network with up to three connections for free. This was more then enough for our usecase because we used one connection for the server and another for the PC providing remote support.
Here is a good tutorial on how to setup OpenVPN. Setup OpenVPN for Remote Desktop
We chose to use VNC as our remote desktop protocol instead of RDP, but that is up to you. If you chose to use VNC, we reccomend installing x11vnc on the server.
Setup X11VNC
Reporting Issues
If you encounter an issue when following this guide and you are comfortable with GitHub, please create an issue here. We will respond as timeously as possible. If you are unfamiliar with GitHub, please use the Contact Us page.
